*หัดอ่านบ้าง สมาชิกที่มาโปรโมทเว็บ หรือ บริการ กรุณาตั้งกระทู้ให้ถูกหมวดด้วย ไม่ต้องเนียน เว็บบอร์ดมีคนดูแล ห้าม เว็บการพนัน ลบอย่างเดียว


แสดงกระทู้

This section allows you to view all posts made by this member. Note that you can only see posts made in areas you currently have access to.


Topics - CoolhostPlus

หน้า: 1 2 3 [4] 5 6 7
46
สำหรับผู้ใช้งานที่ใช้งานโฮสติ้งของประเทศไทยอยู่ แต่เวลาใช้ Function date(); แล้วปรากฏว่าเวลาไม่ตรงกับเวลาของประเทศไทย
เราสามารถแบ่งออกเป็นการใช้บริการดังต่อไปนี้ เพื่อการตั้งค่าระบบเวลาให้ตรงตามความเป็นจริง

สำหรับคนที่ใช้ VPS หรือ เซิฟเวอร์เสมือน หรือ เว็บโฮสติ้งที่มีสิทธิ์เข้าถึงการแก้ไขไฟล์ php.ini
สามารถแก้ไขได้ที่ไฟล์ php.ini โดยโค๊ดที่ต้องแก้ไขมีดังต่อไปนี้

ไฟล์?/usr/local/lib/php.ini

ค้นหา  date.timezone = "UTC"  หรือ date.timezone = UTC

แทนที่ด้วย date.timezone = Asia/Bangkok

สำหรับแชร์โฮสติ้ง เราสามารถแก้ไขได้จาก 2 ทางดังต่อไปนี้

ผ่านการใช้งาน .htaccess  เพิ่ม php_value date.timezone asia/bangkok

สำหรับแก้ไขบนภาษา PHP  date_default_timezone_set('Asia/Bangkok');


อ้างถึง
บนความจาก xvlnw.com/read/2191

47
.htaccess Rules for Better Google Page Speed

สร้างไฟล์ .htaccess แล้วนำโค้ดข้างล่างมาใส่  และอัพไว้ที่เดี๋ยวกันกับสคริป

โค๊ด: [Select]
# Turn on Expires and set default to 0
ExpiresActive On
ExpiresDefault A0
 
# Set up caching on media files for 1 year (forever?)
<FilesMatch "\.(flv|ico|pdf|avi|mov|ppt|doc|mp3|wmv|wav)$">
ExpiresDefault A29030400
Header append Cache-Control "public"
</FilesMatch>
 
# Set up caching on media files for 1 week
<FilesMatch "\.(gif|jpg|jpeg|png|swf)$">
ExpiresDefault A604800
Header append Cache-Control "public"
</FilesMatch>
 
# Set up 2 Hour caching on commonly updated files
<FilesMatch "\.(xml|txt|js|css)$">
ExpiresDefault A604800
Header append Cache-Control "proxy-revalidate"
</FilesMatch>
 
<FilesMatch "\.(js|css|xml|gz)$">
Header append Vary Accept-Encoding
</FilesMatch>
 
# Force no caching for dynamic files
<FilesMatch "\.(php|cgi|pl|htm)$">
ExpiresActive Off
Header set Cache-Control "private, no-cache, no-store, proxy-revalidate, no-transform"
Header set Pragma "no-cache"
</FilesMatch>
 
AddEncoding gzip .gz
<Files *.css.gz>
  ForceType text/css
</Files>
<Files *.js.gz>
  ForceType text/javascript
</Files>
<FilesMatch .*\.(js|css)>
  RewriteEngine On
  RewriteCond %{HTTP_USER_AGENT} !MSIE
  RewriteCond %{HTTP:Accept-encoding} gzip
  RewriteCond %{REQUEST_FILENAME}.gz -f
  RewriteRule ^(.*)$ $1.gz [L]
</FilesMatch>


อ้างถึง
ที่มา https://gist.github.com/jentanbernardus/8591470

48
วันนี้ทางทีมงานว่าง เลยลองติดตั้ง let’s encrypt หรือ SSL certificate ฟรี มาให้ใช้งานกัน


มาเริ่มกันเลย


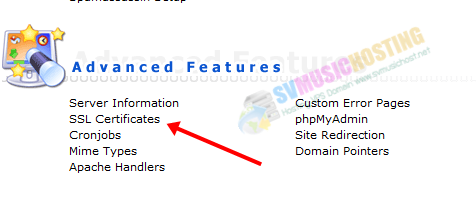
1.หลังจากเข้าสู่ระบบ Control Panel ของโฮสติ้งเรียบร้อยแล้ว ให้คลิกที่เมนู SSL Certificates


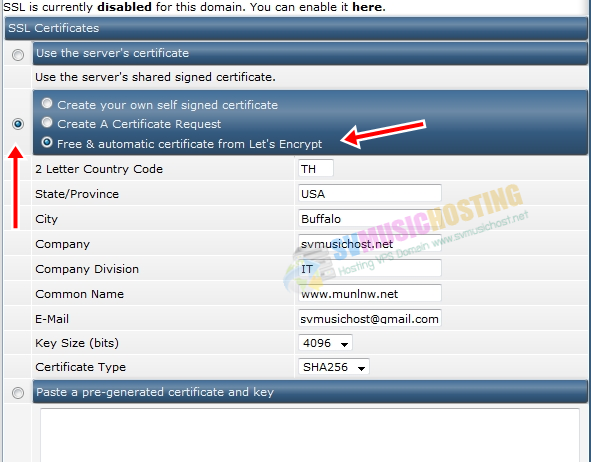
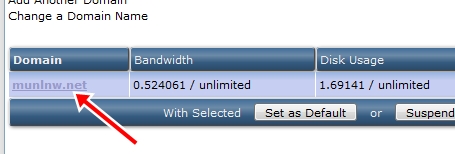
2.คลิกเลือก Free & automatic certificate from Let’s Encrypt โดยการเลือกตามลำดับดังรูปตัวอย่าง และใส่ข้อมูลป็นภาษาอังกฤษทั้งหมดดังตัวอย่าง


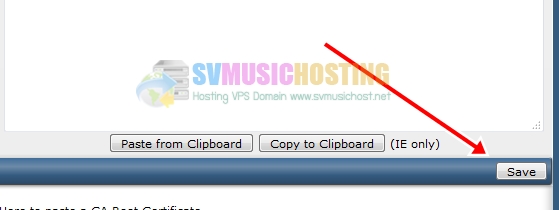
3.กดปุ่ม Save ด้านล่าง แล้วรอสักครู่


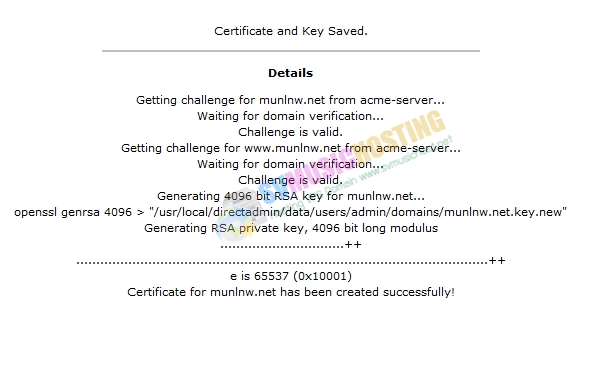
4.เมื่อระบบได้ลงทะเบียนเรียบร้อย จะขึ้นข้อความ Certificate for XXX has been created successfully!
ด้านล่างสุดดังรูปตัวอย่าง


เพิ่มเติม


1.หากต้องการให้ข้อมูลเว็บไซต์แสดงเหมือนเดิมแบบไม่ต้องย้าย แบบ http และ https สามารถทำได้ดังนี้ครับ


2.กดที่ชื่อโดเมนที่ต้องการ


3.ทำเครื่องหมายถูกหน้า Use a symbolic link from private_html to public_html … ดังรูป จากนั้นกดปุ่ม Save
หากไม่เลือก public_html เราจะต้องย้ายข้อมูลเว็บไปที่ folder private_html


ข้อควรระวัง หลังจากกดปุ่ม Save แล้ว ระบบจะแจ้งเตือนว่า จะทำการลบไฟล์ทีอยู่ใน private_html ทั้งหมด ให้ตรวจสอบให้แน่ใจก่อนว่า ในโฟงเดอร์ดังกล่าว ไม่มีไฟล์ใดๆอยู่ หรือได้สำรองไว้แล้ว หลังจากนั้นกดปุ่ม OK

49
ห้องแจก Free Site Themeplate Css / ฟรี theme wordpress black tube สวยๆ
« เมื่อ: มีนาคม 28, 2016, 18:03:54 »
ฟรี theme wordpress black tube สวยๆ สำหรับเว็บ วีดีโอ หนัง


อ้างถึง
ตัวอย่าง http://demo.wptuber.com/?theme=Black_Tube

ดาวน์โหลดธีม *****ข้อมูลถูกซ่อนอยู่ โปรดตอบกระทู้เพื่อดูข้อมูล( กรุณาสมัครสมาชิก )*****

เครดิตจำไม่ได้แล้วครับ ว่าโหลดมาจากเว็บไหน นานแล้ว ^^


สมัครสมาชิกเพื่อโหลด

 ??? ??? ??? ???


50
สำหรับ SMF 2.0.x
เปิดไฟล์ index.template.php สำหรับธีมที่ใช้

หาโค้ด

โค๊ด: [Select]
', !empty($context['meta_keywords']) ? '
<meta name="keywords" content="' . $context['meta_keywords'] . '" />' : '', '

แทนที่หา

โค๊ด: [Select]
';
if (!empty($context['current_topic'])){
$keystring = str_replace(' ', ',', trim($context['page_title_html_safe']));
echo '<meta name="keywords" content="', $keystring, '" />';
   }
elseif (!empty($context['current_board'])){
$keystring = str_replace(' ', ',', trim($context['page_title_html_safe']));
echo '<meta name="keywords" content="', $keystring, '" />';
}
else
{
echo '<meta name="keywords" content="', $context['meta_keywords'], '" />';
}
echo '


51
Simple Machines Forum [SMF] / วิธีลบ PHPSESSID ออกจากหลัง
« เมื่อ: กุมภาพันธ์ 28, 2016, 18:32:52 »
เปิดไฟล์ /Sources/Subs.php
หา
โค๊ด: [Select]
   if (!isset($context['page_title']))
      $context['page_title'] = '';

วางไว้หลังหา

โค๊ด: [Select]
   //Anti-SID(PHPSESSID) canonical tag
   if( !empty($context['canonical_url']) )
   {
      if( !empty($modSettings['queryless_urls']) )
      {
         if( !empty($context['current_topic']) )
            $context['canonical_url'] = str_replace('?topic=', '/topic,', $context['canonical_url']) . '.html';

         elseif (!empty($context['current_board']))
            $context['canonical_url'] = str_replace('?board=', '/board,', $context['canonical_url']) . '.html';

         elseif( empty($context['current_action']) )
         {
            if( isset($_REQUEST['page']) )
               $context['canonical_url'] = str_replace('?page=', '/page,', $context['canonical_url']) . '.html';
            elseif( isset($_REQUEST['cat']) )
               $context['canonical_url'] = str_replace('?cat=', '/cat,', $context['canonical_url']) . '.html';
         }
      }

      //href must bee in '', not in ""
      $context['html_headers'] .= '<link rel="canonical" href=\'' . $context['canonical_url'] . '\' />';

      //lock default canonical tag for SMF 2.0
      $context['canonical_url'] = '';
   }


เปิดไฟล์ /Sources/Profile.php
หา
โค๊ด: [Select]
$profile_include_data['function']($memID);

วางหลังที่หา

โค๊ด: [Select]
   //Anti-SID(PHPSESSID) canonical tag
   $tmp1 = end($context['linktree']);
   $context['canonical_url'] = $tmp1['url'];
   if( $context['user']['is_owner'] )
      $context['canonical_url'] .= ';u=' . $memID;


เปิดไฟล์ /Sources/Calendar.php
หา
โค๊ด: [Select]
   // If applicable, add the current week to the linktree.

วางก่อนที่หา

โค๊ด: [Select]
   //Anti-SID(PHPSESSID) canonical tag
   $tmp1 = end($context['linktree']);
   $context['canonical_url'] = $tmp1['url'];

อ้างถึง
เครดิตที่มา http://custom.simplemachines.org/mods/index.php?mod=3315

52
เริ่มจากสร้างไฟล์ขึ้นมา ด้วยโปรแกรม notepad แล้วตั้งชื่อว่า topic.php ข้างในเขียนดังนี้
(พาท home/domains/public_html/smf/SSI.php
ให้แก้ไขตามโดเมนที่ใช้ต้องรู้ที่อยู่ของ ssi.php ก่อน
ถ้าไม่รู้ลองอัพโหลดเข้าเซอร์เวอร์แล้ว รันไฟล์ดูถ้าไม่ถูกจะขึ้นเออเร่อร์ ถ้าถูกก็จะโชว์ข้อความทั้ง 5 กระทู้
หากต้องการมากกว่านั้นให้ที่เลขตรงคำว่า <?php ssi_recentTopics(5); ?> เป็น <?php ssi_recentTopics(10); ?> )
-------------------------------------------------------------------------
อ้างถึง
<?php require("/home/domains/public_html/smf/SSI.php"); ?>

<html>

<head>
<meta http-equiv="Content-Language" content="th">
<meta http-equiv="Content-Type" content="text/html; charset=tis-620">
<title>Show New Topics</title>
</head>
<body>
<basefont size=2>
<?php ssi_recentTopics(5); ?>
</body>
</html>

-----------------------------------------------------------------------
เสร็จแล้วให้แก้ไขตาม template ที่เราใช้อยู่ หาไฟล์ BoardIndex.template.php แล้วแทรกโค้ดดังนี้(เช็คพาทให้ตรงกะอันแรกด้วย)
วางไว้บรรทัดที่ 2 บรรทัดแรกจะเป็น <?php
----------------------------------------------------------------------
อ้างถึง
require("/home/domains/public_html/smf/SSI.php");
---------------------------------------------------------------------
หาที่วางตำแหน่งที่ต้องการให้แสดงกระทู้ล่าสุด เช็คพาทด้วยเพราะแต่ละที่ไม่เหมือนกัน
อันนี้อัพโหลดไฟล์ topic.php ไว้ในโฟลเดอร์ smf
----------------------------------------------------------------------------------

โค๊ด: [Select]
echo '<div class="catbgf" style="padding-top: 5px; text-align: center; "><b>Recent Topics</b></div><center>';
include_once("/home/domains/public_html/smf/topic.php");
echo '</center>';

----------------------------------------------------------------------------------
เสร็จละ

ขอบคุณที่มา 
อ้างถึง
http://www.thaicreate.com/php/forum/046123.html

53
นำเอารูปภาพที่แนบเป็น img มาโชว์ตามที่ ที่ต้องการ เช่นหน้าแรก หรือ ส่วนบนของหน้า เป็นต้น

ที่ไฟล์ ssi.php

เติมโค้ดนี้ไปก่อน ถึงเครื่องหมาย  ?>

โค๊ด: [Select]
/**
* SSI - ZoneITpic
* @author: Expertduck
* @since : 12/4/2012 4.44
*
* ssi_zpic($boards,$num=10,$return=false,$sort='id_topic',$asc=false)
* Param  $boards : ใส่ id_board หรือ array(id_board,id_board,id_board, .... )
* Param $num : จำนวนกระทู้สูงสุดที่ดึง
* Param $return : true หรือ false ถ้าอยากให้ return ค่ากลับมาให้ใส่ true ครับ
* Param $sort : เรียงตาม คอลั่มใด (ต้องเข้าไปดูใน DB ครับ)
* Param $asc : เรียงจาก a-z น้อยไปมาก (true)  หรือ z-a มากไปน้อย (false) ครับ
 **/
function ssi_zpic($boards,$num=10,$return=false,$sort='id_topic',$asc=false)
{
global $scripturl, $smcFunc;

//Debug? error_reporting(E_ALL);

if(is_numeric($boards))
$boards = array($boards);
else if(!is_array($boards)){
trigger_error('$boards ต้องเป็น Array หรือ ตัวเลข');
return;
}
$regex = '\[img\]([^\[]*)\[\/img\]';
$req = $smcFunc['db_query']('','
SELECT msg.id_topic,msg.body,msg.subject
FROM {db_prefix}messages as msg
INNER JOIN {db_prefix}boards AS b ON(b.id_board = msg.id_board)
WHERE
{query_wanna_see_board}
AND msg.body REGEXP "'.addslashes($regex).'" != 0
AND b.id_board IN({array_int:boards})
ORDER BY '.$sort.' '.(!empty($asc)?'ASC':'DESC').'
LIMIT {int:num}',
array(
'boards' => $boards,
'num' => abs(intval($num))
)
);

$topics = array();
while($row = $smcFunc['db_fetch_assoc']($req))
{

if(preg_match('!'.$regex.'!',$row['body'],$match)===false)
continue; //skip loop ไม่น่าจะเกิดขึ้นเพราะเช็คจาก SQL แล้วครั้งนึง แต่ก็กันไว้ก่อน

$topics[$row['id_topic']] = array(
'id' => $row['id_topic'],
'subject' => htmlentities($row['subject'],ENT_QUOTES,'UTF-8'), //ป้องกัน XSS
'pic' => htmlentities($match[1],ENT_QUOTES,'UTF-8'),
);

}
$smcFunc['db_free_result']($req);

//สำหรับ Argument $return;
if(!empty($return))
return $topics;

if(empty($topics))
{
//กรณี หากระทู้มีรูปไม่เจอ
echo '<b>No Topics</b>';
return; //ตัดการทำงาน ฟังชั่น
}

echo '
<div class="zpic-container">';
while($topic = array_shift($topics))
{
echo '
<a class="link-topic" href="'.$scripturl.'?topic='.$topic['id'].'" title="ดูกระทู้นี้">
<img clas="pic" src="'.$topic['pic'].'" alt="'.$topic['subject'].'" />
<b class="subject">'.$topic['subject'].'</b>
</a>';

}

echo '
</div><!-- by: Zone-it -->';

}

/**
* SSI - ZoneITpic
* @author: Expertduck
* @since : 12/4/2012 4.44
*
* ssi_zpic($boards,$num=10,$return=false,$sort='id_topic',$asc=false)
* Param  $boards : ใส่ id_board หรือ array(id_board,id_board,id_board, .... )
* Param $num : จำนวนกระทู้สูงสุดที่ดึง
* Param $return : true หรือ false ถ้าอยากให้ return ค่ากลับมาให้ใส่ true ครับ
* Param $sort : เรียงตาม คอลั่มใด (ต้องเข้าไปดูใน DB ครับ)
* Param $asc : เรียงจาก a-z น้อยไปมาก (true)  หรือ z-a มากไปน้อย (false) ครับ
 **/

ตัวอย่าง
<? ssi_zpic(1); ?>  ดึงกระทู้ที่มีรูปจาก board_id = 1 มาจำนวน 10 กระทู้ครับ (Default = 10 กระทู้)
<? ssi_zpic(array(1,2,9),20,false); ?>  ดึงกระทู้ที่มีรูปจาก board 1,2,9 มาจำนวน 20 กระทู้ครับ (แต่ละบอร์ดรวมกันนะครับ เรียงตาม id กระทู้น้อยไปมาก)
แบบ return values; ครับ
<?

$topics = ssi_zpic(array(1,2),20,true);
print_r($topics);
?>

สำหรับ css ที่ต้องกำกับ มี (เขียนเอาเองนะครับ ผมขี้เกียจล่ะ)
.zpic-container{ /** สำหรับ กล่องครอบ ครับ **/}
.zpic-container .link{  /** link **/ }
.zpic-container .subject{ /* subject **/}
.zpic-container .pic{ /** รูป **/ }

ตรง $topics = ssi_zpic(array(1,2),20,true);  คือ id ของบอร์ด


สร้างไฟล์ใหม่ ที่เดียวกับ ssi.php แล้วใส่โค้ดต่อไปนี้

อ้างถึง
<?
require_once('SSI.php');

$ratio = 3/4;
$width = 150;
$height = $width * $ratio;

echo '
<style type="text/css">
#zone-pic a{
   color:#000;
   text-decoration:none;
   text-align:center;
   font-size:12px;
   line-height:14px;
   display:block;
}
#zone-pic .item{
   width:150px;
   float:left;
   margin:15px;
}
#zone-pic .item .thumb{ /** css crop image **/
   width: 150px;
   height:125px;
   padding:2px;
   overflow:hidden;
   background:#fff;
   border:1px dashed #ccc;
   
}
#zone-pic .item img{ /** css trick full width aspect ratio **/
   
   width:100%;
   height:auto;
   min-height:100%;
   display:block;
}
#zone-pic .row{
   display:block;
   clear:both;
}
</style>';

$num = 10;
$links = array();
foreach(ssi_zpic(array(1,2),$num,true) as $topic)
{
   $links[] =    '
   <div class="item">
      <a class="thumb" href="'.$topic['pic'].'" title="คลิ๊กดูรูปใหญ่"><img src="'.$topic['pic'].'" alt="" /></a>
      <a href="'.$scripturl.'?topic='.$topic['id'].'" title="">'.$topic['subject'].'</a>
   </div>';
}

$nRow = 2;

echo '<div id="zone-pic">';
for($i=0;$i<$nRow;$i++)
{
   $row = array_splice($links,0,floor($num/$nRow));
   echo '
      <div class="row">'.implode(' ',$row).'</div>';
}
echo '</div>';


ตรง  nrow = 2 คือจำนวนแถวของรูป
ตรง  num = 10 คือจำนวนกระทู้ที่ต้องการเอามาใช้


จากนั้นก็เอาไปใส่ใน board index  เพื่อใช้งาน

ขอบคุณที่มา
อ้างถึง
http://computech.co.th/webboard/index.php?topic=321.0

54
Relative Dates แสดงเวลาแบบ , วินาทีที่แล้ว , นาทีที่แล้ว , ชั่วโมงที่แล้ว smf

เมื่อเราตั้งกระทู้ใหม่ มันก็จะนับเป็น 1 วินาที ขึ้นไป เรื่อย ๆ

วิธ๊ทำตามนี้ได้เลย


./Sources/Subs.php

ค้นหา
อ้างถึง
if ($then['yday'] == $now['yday'] && $then['year'] == $now['year'])
         return $txt['today'] . timeformat($log_time, $today_fmt, $offset_type);

แก้ไขเป็น
อ้างถึง
if ($then['yday'] == $now['yday'] && $then['year'] == $now['year'])
      {
         // SMF has room for relative dates, no?
         if ($modSettings['todayMod'] == 3 && (empty($modSettings['enable_rt_xml']) && !isset($_REQUEST['xml']) || !empty($modSettings['enable_rt_xml']) && !isset($_REQUEST['xml'])))
         {
            // Determine the relative dates
            $seconds = $nowtime - $time;
            $minutes = floor($seconds / 60);
            $hours = floor($minutes / 60);

            // Numbers need language strings, too
            if ($seconds > -1)
            {
               if ($hours > 0 && $minutes > 59)
                  $retVal = $hours . ' ' . ($hours == 1 ? $txt['hour'] : $txt['hours']) . '  ' . $txt['ago'];
               elseif ($minutes > 0 && $seconds > 59)
                  $retVal = $minutes . ' ' . ($minutes == 1 ? $txt['minute'] : $txt['minutes']) . '  ' . $txt['ago'];
               else
                  $retVal = $seconds . ' ' . ($seconds == 1 ? $txt['second'] : $txt['seconds']) . '  ' . $txt['ago'];
            }
            // Time is in the future so rework : P
            else
            {
               $seconds = $time - $nowtime;
               $minutes = floor($seconds / 60);
               $hours = floor($minutes / 60);
               if ($hours > 0 && $minutes > 59)
                  $retVal = $txt['in'] . '  ' . $hours . ' ' . ($hours == 1 ? $txt['hour'] : $txt['hours']);
               elseif ($minutes > 0 && $seconds > 59)
                  $retVal = $txt['in'] . '  ' . $minutes . ' ' . ($minutes == 1 ? $txt['minute'] : $txt['minutes']);
               else
                  $retVal = $txt['in'] . '  ' . $seconds . ' ' . ($seconds == 1 ? $txt['second'] : $txt['seconds']);
            }
         }
         // Defaults FTW!
         else
            $retVal = $txt['today'] . timeformat($log_time, $today_fmt, $offset_type);

         return $retVal;
      }


./Sources/ManageSettings.php

ค้นหา
อ้างถึง
, $txt['yesterday_today']


เพิ่มต่อที่หา
โค๊ด: [Select]
, $txt['relative_today']


ในส่วนของไฟล์ภาษา  ./Themes/default/languages/ไฟล์ภาษาของเว็บท่าน.php

อ้างถึง
$txt['hours'] = 'hours';
$txt['minutes'] = 'minutes';
$txt['seconds'] = 'seconds';
$txt['hour'] = 'hour';
$txt['minute'] = 'minute';
$txt['second'] = 'second';
$txt['ago'] = 'ago';
$txt['in'] = 'in';
$txt['relative_today'] = 'Today with relative times';

เสร็จแล้ว


Mod Name: Relative Dates
Created By: live627
Type: Theme Enhancements
Latest Version: 1.2
Compatible With: 1.1.11, 1.1.13, 1.1.15, 1.1.16, 2.0, 2.0.1, 2.0.2

credit Mod
http://custom.simplemachines.org/mods/index.php?mod=2432


Read more : http://www.justusers.net/forum/index.php?topic=10106.0


55
Simple Machines Forum [SMF] / การเปลี่ยนรูปแบบวันที่ใน SMF
« เมื่อ: กุมภาพันธ์ 18, 2016, 23:31:27 »
วิธีทำ

ไปที่ ผู้ดูแล >> ปรับแต่งบอร์ด >> Features and Options >> ทั่วไป

เลื่อนลงมาจะเจอ Default time format

ในนั้นจะเขียนว่า %B %d, %Y, %I:%M:%S %p

นั่นก็คือรูปแบบเวลานั่นเอง

ทีนี้เราจะเปลี่ยนเราก็ต้องรู้ว่า %อะไรหมายถึงอะไร เรามาดูกันดีกว่า


a แสดงคำว่า am หรือ pm ในรูปแบบตัวพิมพ์เล็ก
A แสดงคำว่า AM หรือ PM ในรูปแบบตัวพิมพ์ใหญ่
d แสดงวันที่แบบเลข 2 หลัก คือ "01" ถึง "31"
D แสดงชื่อวันภาษาอังกฤษแบบย่อ เช่น "Sun" , "Fri" เป็นต้น
F แสดงชื่อเดือนภาษาอังกฤษเช่น "January"
h แสดงเวลาชั่วโมงแบบ 2 หลัก "01" ถึง "12"
H แสดงเวลาชั่วโมงแบบ 2 หลัก "00" ถึง "23"
g แสดงเวลาชั่วโมงแบบไม่มีเลข 0 นำหน้า "1" ถึง "12"
G แสดงเวลาชั่วโมงแบบไม่มีเลข 0 นำหน้า "0" ถึง "23"
i แสดงเวลานาที "00" ถึง "59"
j แสดงวันที่แบบไม่มีเลข 0 นำหน้า "1" ถึง "31"
l แสดงชื่อวันภาษาอังกฤษแบบเต็ม เช่น "Monday"
L แสดงค่าทางตรรกะ คือ มีค่า 0 หรือ 1 ในปีที่เป็นอธิกมาส
m แสดงเดือนแบบตัวเลขมีเลข 0 นำหน้า "01" ถึง "12"
n แสดงชื่อเดือนภาษาอังกฤษแบบย่อ 3 ตัวอักษร เช่น "Feb"
s แสดงเวลาวินาที "00" ถึง "59"
S แสดงส่วนต่อท้ายของวันที่ เช่น "th", "nd"
t แสดงจำนวนวันใน 1 เดือน
w แสดงตัวเลขของวันใน 1 สัปดาห์ เช่น "0" = Sunday ถึง "6" = Saturday
Y แสดงปี ค.ศ. ตัวเลข 4 หลัก เช่น "1990"
y แสดงปี ค.ศ. ตัวเลข 2 หลัก เช่น "90"
z แสดงลำดับวันใน 1 ปี คือตั้งแต่ "0" ถึง "365"

ทีนี้เราจะเปลี่ยนเวลาเป็นรูปแบบไหนก็ได้ตามใจชอบแล้ว

เช่นจะเปลี่ยนเป็น 31/12/14 ก็แก้เป็น %d/%m/%y  เป็นต้น


56
Simple Machines Forum [SMF] / วิธีลบ แก้ไขครั้งสุดท้าย โดย Admin
« เมื่อ: กุมภาพันธ์ 18, 2016, 23:21:37 »
แก้ไฟล์นี้ ที่ไฟล์ Display.template.php ของธีมที่ใช้ หากธีมที่ใช้ไม่มีไฟล์นี้
ให้แก้ที่ ธีม default


ค้นหา
อ้างถึง
// Show "� Last Edit: Time by Person �" if this post was edited.
      if ($settings['show_modify'] && !empty($message['modified']['name']))
         echo '
                        &#171; <em>', $txt['last_edit'], ': ', $message['modified']['time'], ' ', $txt['by'], ' ', $message['modified']['name'], '</em> &#187;';

เจอแล้วให้ลบทิ้งไปเลยก็ได้ หากจะไม่ใช้งานต่อ

เสร็จ ...


57
แจก THEME MSO Online Shop  สำหรับร้านค้าออนไลน์ CMS Opencart


ฟีเจอร์หลักๆ  ของธีมนี้ครับ
-    Responsive Design
-    ป้ายแบนเนอร์อยู่บนสุด (ถ้าแสดง 1 ภาพก็จะแสดงเป็นภาพนิ่ง กำหนดให้แสดงได้ทุกหน้า)
-   ฟุตเตอร์รก ๆ ผมตัดออกหมดครับจะเหลือแค่ลิงค์ copy right กับ credit link
-   ปรับขนาดความกว้างให้แสดงแบบเล็กสุดได้ที่ 1024 px.  (ปรับได้ 3 ขนาด 1280 px, 1170px, 1024px )
-   หน้าแสดงรายละเอียดสินค้าจะ แสดงรูปภาพมุมมองเพิ่มเติมในส่วนของ description ให้อัตโนมัติ
-   พื้นหลังและฟุตเตอร์สามารถใส่เป็นรุปภาพได้ (มี texture background ภาพที่ผมถ่ายเองใส่ไปให้ประมาณ 10 ภาพครับ สามารถทดลองเล่นดูได้ )
-   ปิดโหมดตระกร้าสินค้าได้ (ซ่อนปุ่มทุกหน้าที่เป็นตระกร้าสินค้า) เพื่อเป็นร้านค้าออนไลน์สไตล์แคตตาล็อคให้เลือกชม โดยไม่มีการสั่งซื้อผ่านหน้าเว็บ
-   เปลี่ยนสีเมนูหลักได้ ( สีไอค่อนที่อิงกับสีเมนูหลักจะเปลี่ยนตามทั้งหมด)
-   ฟีเจอร์มาตรฐาน  ระบบภาษาไทยหน้าร้าน / หลังร้าน – แจ้งการชำระเงิน – ค่าจัดส่ง –ส่วนลด

เดโมเว็บไซต์  http://ecomth.com/msoweb


ดาวน์โหลด  >> http://bit.ly/2II2RJf <<


ติดตามรายละเอียดได้ที่ http://www.thaiseob....hp/to....8204.0.html


 8) 8) 8)


58
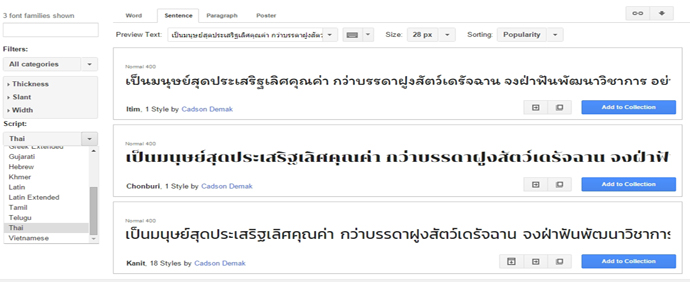
google fonts มี font thai แล้วนะครับ

https://www.google.com/fonts

ฟ้อนต์สวย ๆ เหล่านี้เป็นผลงานของ คัดสรร ดีมาก บริษัททำฟ้อนต์ชื่อดังของเมืองไทยที่เป็นผู้ทำฟ้อนต์ Sukhumvit ฟ้อนต์ไทยฟรีใน OS X นั่นเองครับ ซึ่งเค้าก็ใจดีทำฟ้อนต์ใน Google Fonts มาให้ถึง 3 แบบ 3 สไตล์

ฟ้อนต์ Itim (ไอติม) – ฟ้อนต์กลม ๆ น่ารัก ๆ เหมาะกับงานออกแบบสำหรับเด็ก
ฟ้อนต์ Chonburi (ชลบุรี) – ฟ้อนต์โค้งเยอะ ๆ ดู Elegant เหมาะกับงานออกแบบสไตล์หรูหรา
ฟ้อนต์ Kanit (คณิต) – ฟ้อนต์ไม่มีหัวหน้าตา Modern เหมาะกับงานออกแบบสมัยใหม่ (อารมณ์ Supermarket, RSU, Thai Sans ที่เราชอบใช้กันเลย)


59
การแก้ไขปัญหาการสตาร์ต Apache httpd Server

หากเวลารันเว็บเซิร์ฟเวอร์ apache เซอร์วิส httpd แล้วต้องรอนานกว่าจะสตาร์ตได้ หรือขึ้นข้อความ error แบบนี้


สาเหตุเป็นเพราะ httpd ไม่สามารถที่จะแปลงชื่อเครื่อง hostname ให้เป็น IP Address ได้

ใช้คำสั่ง hostname เพื่อดูชื่อเครื่อง

อ้างถึง
[root@cent6 ~]# hostname
cent6.example.com


การแก้ไขวิธีหนึ่งที่ทำได้คือแก้ไฟล์ /etc/hosts ของเครื่องเว็บเซิร์ฟเวอร์เอง  เพื่อแปลงชื่อ (map) ให้เป็น IP Address
เช่น ถ้า IP ของเครื่องเว็บเซิร์ฟเวอร์นี้คือ 192.168.5.62 สามารถเพิ่มบรรทัดในไฟล์ /etc/hosts ได้ดังนี้

อ้างถึง
[root@cent6 ~]# cat /etc/hosts
127.0.0.1   localhost localhost.localdomain localhost4 localhost4.localdomain4
::1         localhost localhost.localdomain localhost6 localhost6.localdomain6

192.168.5.62 cent6.example.com


ลองรันคำสั่ง service เพื่อ stop แล้ว start ใหม่ น่าจะเร็วขึ้น และไม่ชึ้น error อีกแล้ว

อ้างถึง
[root@cent6 ~]# service httpd stop
Stopping httpd:                                            [  OK  ]

[root@cent6 ~]# service httpd start
Starting httpd:                                            [  OK  ]


ขอบคุณบทความดีๆ จาก spalinux.com


60
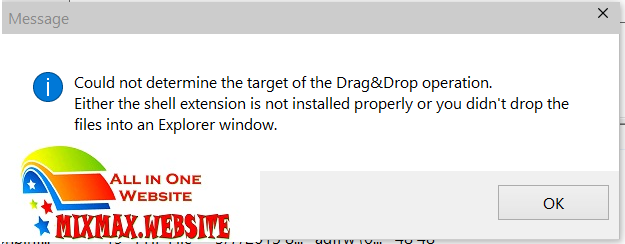
Fix!! FileZilla Drag and Drop Error in Windows 7, 8,8.1,10 Updated Method


Don’t worry we have come with an easy fix for this error message. We have tested this method on windows 7 (x86/x64), windows 8 & 8.1 and windows 10 tech preview and insiders preview and worked perfectly.

Here is what we did to fix drag & drop error of FileZilla:

First Open command prompt (cmd) and run it as Administrator.

Go to the location of Filezilla.For 32 bit OS and 64 bit OS and 32 bit version

of filezilla and 64-bit version of Filezilla  respectively,use below command:

C:\Windows\system32>cd/C:\>cd “Program Files”

C:\Program Files>cd “FileZilla FTP Client”

    For 64 bit OS with 32 bit version of Filezilla use below command:

    C:\Windows\system32>cd/

    C:\>cd “Program Files (x86)”

    C:\Program Files (x86)>cd “FileZilla FTP Client”
If you are using 64-bit operating system then just type this command : regsvr32 fzshellext_64.dll .
For 32-bit OS use this command: regsvr32 fzshellext.dll
A new dialog box will appear saying: DllRegisterServer in fzshellext_64.dll succeeded. Click on OK button.

Now restart you pc. The error will be fixed now.

VIDEO TUTORIAL for Fixing FileZilla Drag and Drop Error:

The Following tutorial is meant to fix the annoying message shown by filezilla while dragging files from server to desktop


ขอบคุณบทความดี ๆ จาก http://mixmax.webs....windows-7-88-110.....method

หน้า: 1 2 3 [4] 5 6 7